Background
EDIT JAN 7, 2019
Warning! Before beginning this tutorial, note that I have **fried** two Zsun devices nearly immediately after doing these steps. My theory appears to be correct that as soon as you flash to OpenWRT the default power output is way, way too high and so it starts heating up and frying it. Within about 15 minutes of flashing both devices were dead and inaccessible – their SSID didn’t even show up. I am now testing another one where I dropped the power to low and it’s still alive after about 45 minutes. Therefore pay special attention I’m going to test another one now, but in case you find this blog today, you might want to wait a few days for my findings….
I found a lot of pages on the internet showing that it’s possible to flash OpenWRT onto a Zsun Smart Card Reader. A friend gave me a couple and I wanted to try some mesh network ideas. However, for some reason I couldn’t find everything in one spot for Ubuntu, so I’m writing this guide for anyone else who might want to try. There was also a significant bug I encountered which I overcame which might help you if you have tried and failed in the past.
I also recommend staying fully disconnected from your home wifi while you are doing this to avoid confusion. If you have access to an ethernet cable and router this will make things a bit more simple.
What You Will Need
- Zsun Reader
- micro SD card to insert into reader – BONUS! I just discovered you only need this for the flashing process and then can remove and use again for flashing other devices (microSD not required to function as extender!)
- Ubuntu machine with understanding of how to open a Terminal
- (optional) A dedicated folder/directory on your computer where you can ‘do all your actions’. I find this reduces risks and helps you keep your files in one place. You can even download this blog to PDF and put it in the same folder.
- All the stuff you need in one place on local machine (because your internet will go down while flashing)
Step 1: Download to local machine the File you will need to flash onto the Zsun
I found it really hard to find the file on this page. Here is a direct link to the file and save this in a memorable location on your computer as we’ll need to access it soon.
Step 2: Make sure your micro SD card is formatted to FAT32
On ubuntu you can do this by pressing the super key, typing ‘disk’and using the disk utility. Note – always unplug all external drives you do not want to accidentally kill! Also pay super-special attention you are not accidentally formatting your own computer’s hard drive (I’ve done this hard life lesson and you don’t want it)
Step 3: Insert empty and correctly formatted card into the Zsun card reader
Self explanatory
Step 4: Plug in Zsun card reader into your computer (or any powered usb slot)
Self explanatory
Step 5: Connect the Zsun to your WIFI network
This is funny because I totally missed this step and (obviously) it has to be connected to the network in order for it to show up in network and be able to access the admin page. I had an attempted connection which failed and then the second time it connected. You connect to it like any wifi network but it won’t ask for a password.
Step 6: Make Card Accessible to Admin
I ‘guess’ that this step in one of the tutorials I read preps the card to be able to access via Samba. Not sure, I could not access the files on the card until I performed this step so let’s do that now. In a browser, copy/paste this:
http://10.168.168.1:8080/goform/Setcardworkmode?workmode=0
It should spit back this:
{"status":"0"}
Note: if you get ‘connection refused’ message in the next step you may have to re-try this command a few times. Make sure you are actually connected by wifi to device. One time I had to do a full computer reboot too and then it seemed to work.
Step 7: Access the Zsun via Samba (SMB)
(reminder this is an Ubuntu tutorial so you might have to do it a different way on your machine if it isn’t the same)
The super painful part of this tutorial for me is that this easy part was subject to a weird Ubuntu bug that tracks back nearly 10 years. If you are bored you can read about it here, but probably, like me, you just want to hack this zsun and then put evertyhing back the way it was. So let’s do that:

Step 8: Overcoming the Ubuntu Samba Username password bug
- in a terminal enter this:
sudo nano /etc/samba/smb.conf - Scroll down into the ‘Authentification’ section.
- at the very bottom in the space just above the “Domains” section, paste in (with control shift paste) this:
security = user
client use spnego = no
ctrl xto get outctrl yto agree to write the changes

Step 9: Continue with Tutorial and Accesss the Zsun via Samba
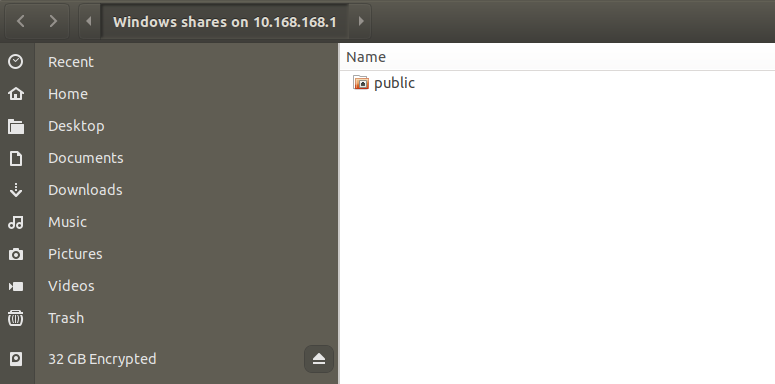
- Open Nautilus (called ‘Files’ on the launcher) (the file cabinet icon thing…)
- Go to ‘Other locations’ on the left menu at the bottom. A ‘Enter server address’ field will appear.
- Type in zsun address as follows: smb://10.168.168.1
- enter admin/admin pass/user (don’t worry about ‘workgroup’)
- when greeted with ‘public’ enter that directory
- hit ‘contrl h’ on your keyboard which will show hidden folders. If you don’t do this step you might not think the next step will work since it’s a hidden folder.
- You should see ‘trash~’ something. But if you don’t… whatever. Seems to work if it’s fully blank too… Here is where you create the following folder (with the dot/period in front):
.updateif it doesn’t appear after creating this folder, review step 6 above… - Drag and drop the file you downloaded way above (SD100-openwrt.tar.gz) into this new .update folder. Yes, the whole tar file, don’t extract it.
- CRITICAL STEP! Before doing step 10, make sure you skip ahead, and deeply familiarize yourself with the steps following it because you will have a short time to do those steps before the device fries and dies. Once you have read it all (especially big step 11 below) then come back here and execute step 10.
- After you are sure that the file is done copying in, go to a browser and enter this:
http://10.168.168.1:8080/goform/upFirmWare
When you see this, things should be working:
{"status":2}
Here is a fair-use paste from buddy’s blog
Wait for the reboot into OpenWRT
Wait for long LED flash, then multiple fast flashes – now OpenWRT is booting for the first time.
There will be a long period of (normal slow) flashing, then one long flash, then a whole bunch of very fast flashes. The ZSun Wifi network disappears, and eventually re-appears as OpenWRT.
What he didn’t add that I discovered was when everything is totally done it will be a solid light colour.
SUPER IMPORTANT NOTE (in case you missed my other 20 warnings…) immediately as quickly as possible and reduce transmission power on device! Learn how to do this in Big Step 11 below …if it’s not too late.
Step 10: Log into your new OpenWRT Mini Router!
I have another OpenWRT router going in my house so right away I’m going to log into the new little guy here and change it’s IP address to something different to make sure they don’t conflict. The default OpenWRT is 192.168.1.1 so we’ll access it there now.
You’ll get a browser warning that it’s not secure. No problem, add exception, move forward.
You’ll be greeted with a log in screen with no password set.
Log in.
Step 11: Turn Down Radio Transmission Power to Prevent Deep Fried Zsun!
IMMEDIATELY reduce the transmission power of the device. The default is set to the maximum power and it will fry/kill this device in less than 10 minutes after you flash it. I lost two devices this way so act quickly as follows:
1. Go to network
2. go to ‘wifi’
3. click ‘edit’ on the ‘OpenWRT’ entry
4. Drop transmit power to 4 (lowest)
5. ‘save and apply’ button at the bottom
This will momentarily disconnect you from the device while it makes these settings. From here, assuming my theory above is true, you can start doing other things now such as resetting your device access password:
Go to ‘system’ and ‘system administration’ and create a new user/password
Step 12: Undo whatever we did to that Samba bug above (If you want)
Remember when we fixed that Samba bug above? I’m frankly not sure if that was a secure thing to do so let’s undo it in your computer just in case by going back in the same way, deleting those lines you added, and then saving.
Step 13: Remove microSD
As mentioned above, the microSD is no longer required if you are just using device as a wifi range extender (see this tutorial). You can unplug, remove microSD and plug it in now.
Step 13: Enjoy!
The rest, my friends, is up to you. Hope this helps!
Thanks to the following resources
- This nice video helped me create this Ubuntu guide
- This great blog entry mentioned at the beginning.
- Of course the awesome people who hacked this thing here
1 thought on “How to Flash OpenWRT onto a Zsun Card”