PGP encryption on your email is not only awesome but it’s now mandatory if you care even the slightest about your personal privacy. If you don’t care about your personal privacy, I invite you to strip naked and dance in front of your living room window towards the street with your blinds open at night…. unless you look like me naked in which case I strongly advise you against such behaviour.
But with all such course jesting aside, the intention of this post is to be the go-to, defacto post for setting up your PGP, and also updating your keys in the event of loss or expired key. I found that if enough time passes I forget everything so I wanted this post to be hanging out online for my own quick and easy reference.
This post is NOT a full blown tutorial about setting up both Thunderbird and Enigmail. I’m sure those are out there somewhere. But, here are a few quick points to make sure you know what’s needed to get set up:
- Get Thunderbird email client (it’s the best anyways) here Note: for mobile users, K9 email client works with PGP and we’ll update this when another option arrives.
- Install the Enigmail under ‘tools/add-on’s in your Thunderbird client
- Create a PGP pair by using the wizard.
This post IS intended for when you update your key (ie. starting again after losing it, expiring it, change encryption strength, etc) because you will need to make sure that you as the maker of the new key do the right steps and that the people you communicate also deal with your new and old keys accordingly.
And that’s what this post is about. It’s the post you come back to as an already-established PGP user. It’s the ‘transitioning from old key to new key’ post.
No, I couldn’t possibly preamble (is that even a verb?) longer if I tried…
Making/Updating the Key
1. Go to Key Managment

2. Go to ‘Generate’ at the top and then ‘New Key Pair’

3. Fill in the details on the first page that opens.
Note 1: It might be useful to make a comment in the common line?
Note 2: Make sure your password is secure. I use KeePassX to both generate and store my passwords.
Note 3: Before you click that generate button, make sure you consider step 4 coming soon!

4. Consider strongly using 4096 key size for today’s needs. Then press ‘generate'(but not before strongly considering the aforementioned 4096 thing)
Note 1: Anything less you are pretty much up the creek if someone wants you bad enough.
Note 2: The generation of the key takes pretty much forever (well for kids my age and younger) so brew a coffee and tinker with your mouse a lot since it helps speed it up.
Note 3: When it’s done I think it gives an option to save your actual public and private keys to a disk. Do this. Do it on a safe and preferably encrypted drive.
Note 4: It will also give you the chance to create a ‘revoke certificate’. You need this certificate to kill your key so save it also in a safe place. Consider, again, KeePassX. I think this can save attachments with each entry.

Making a Smooth Transition to Your New Key (Your Recipient’s Perspective)
1. Have Grandma go to ‘key management’ and make sure she disables your old key (right click on your key)
Note 1: Although all my stuff is blurred out below, the disabled key will be ‘greyed out’ when successfully disabled

2. Send Grandma a signed email with the new key (as .asc attachment) (not uploading using the keyserver pool yet)
Note 1: Make sure it’s signed. Sometimes the rules may hinder it from going out signed. Force it to be signed.
3. You have already told Grandma never to sign a key unless she confirms it in person so she calls you up, confirms you are real and that you sent a new key. Now you have her sign the new key you just sent her by right clicking on the key information in the email body as below.


4. Send Grandma a test email to make sure it’s working
Note 1: Put a message like ‘this email is encrypted’ in the subject heading because subject headings are not encrypted.
Note 2: Make sure it’s actually encrypted! Sometimes the rules are not set to do so (read up on rules as they are useful).
If your recipient gets your email, confirms it’s the new key (sometimes we goof and send the old key) and you are sure it was confirmed and he/she could read it, you are done and all is well.
5. Remove and replace any affected per-user rules
Grandma is the bomb so she already had a rule set up in her ‘per-recipient rules’ under the main Enigmail tab in Thunderbird. However, now that you went ahead and complicated her biscuits by changing your PGP key (thoughtless so-and-so!) key a few annoying things will happen when she goes and tries to invite you over to dinner. Never fear, Grammar! All you have to do is delete that ol’ stinkin’ rule and add a new one with the new key. Just go ahead and do that. If you really need the screenshots put a comment below and I’ll think about it…
Ryuken! Finish him!!
Now at least one trusted person has confirmed your encrypted email with the new key is working. Let’s get this done!
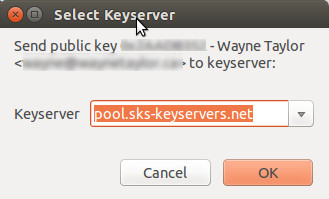
1. Upload your new key to the keyservers so the world will know you mean serious privacy business

Then you’ll see this:
Finally, I suggest this refresh option. It didn’t seem to ‘take’ until I performed this right after doing the upload.

2. Revoke that old, dirty key you used to use.
Just follow this tutorial. It shows you how easy enough.
Note 1: I recommend, like when you upload your normal keys to servers, that you do the refresh option right after you revoke as well.
Some extra notes
- there must be something to write here…?